Swift Dependency Injection with Swinject

As in most loosely coupled projects where we have big chains of dependencies. Swinject makes it simple and easy to do dependency injection. We’re going to use it in combination with the Swifts new property wrapper
Let’s say we have a 3 layer dependency:
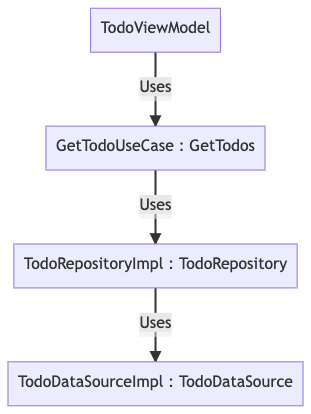
Of course, we can use good old manual dependency injection as follows:
class TodoListViewModel: ObservableObject {
    var getTodosUseCase = GetTodosUseCase(
        repo: TodoRepositoryImpl(
            dataSource: TodoDataSourceImpl()
        )
    )
....
}
class TodoListViewModel: ObservableObject {
    @Inject
    private var getTodosUseCase : GetTodos
....
}
This would allow us to control the external dependencies by simply decorating the property with the Inject annotation and specifying the interface.
So the first thing is the @Inject annotation. In Swift, we use a property wrapper. Since Swift 5.1, the property wrapper feature enables us to attach logic directly to the property itself. Here we create a property wrapper called “Inject” that will automatically assign something to the prop
@propertyWrapper
struct Inject<I> {
    let wrappedValue: I
    init() {
        //Resolve the interface to an implementation.
        self.wrappedValue = Resolver.shared.resolve(I.self)
    }
}
Let’s build the resolver
class Resolver {
    static let shared = Resolver()

    //get the IOC container
    private var container = buildContainer()

    func resolve<T>(_ type: T.Type) -> T {
        container.resolve(T.self)!
    }
}
All we now need is an IOC container. Let’s use Swinject to build one to resolve all interfaces to their respective implementations:
import Swinject
func buildContainer() -> Container {
    let container = Container()
    container.register(GetTodos.self) { _  in
        return GetTodosUseCase()
    }.inObjectScope(.container)
    container.register(TodoDataSource.self) { _  in
        return TodoMockDataSourceImpl()
    }.inObjectScope(.container)
    container.register(TodoRepository.self) { _  in
        return TodoRepositoryImpl()
    }.inObjectScope(.container)
    return container
}


