Jetpack Compose Flat and Hierarchical Navigation

Navigation in your app has to be appropriate: Don’t use non-logical navigation.
Navigation must always be intuitive: Users don’t have time to look for the right section in your app
Don’t steal time from your users: They will delete the app
Navigation must be clear: Users have to always know which screen they are on now
When building a business application the 2 main navigation structures are Hierarchical and Flat.
Hierarchical
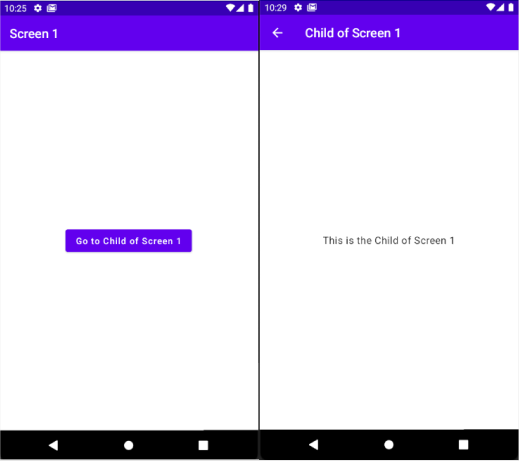
Users navigate by making only one choice per screen until they reach their destination. To get to another destination, users must either retrace, or start from the beginning and make other choices.
We use NavHostController to implement hierarchical navigation
Add this to your project by updating your app module’s build.gradle dependencies
dependencies {
    ...
    implementation("androidx.navigation:navigation-compose:2.4.0-alpha10")
}
Then create a Router component to do all route management. Within this router we map 2 screens to 2 routes: “screen1" and “child1". We keep track of all nav state through a hoisted navController state which is passed down to all routed components.
class MainActivity : ComponentActivity() {
    override fun onCreate(savedInstanceState: Bundle?) {
        super.onCreate(savedInstanceState)
        setContent {
            val navController = rememberNavController()
            MaterialTheme {
                Router(navController)
            }
        }
    }
}

@Composable
fun Router(navController: NavHostController) {
    NavHost(
        navController = navController,
        startDestination = "screen1"
    ) {
        composable("screen1") {
            Screen1(navController)
        }
        composable("child1") {
            Child1(navController)
        }
    }
}

@Composable
fun Screen1(navController: NavController) {
    Scaffold(
        topBar = { TopAppBar(title = { Text("Screen 1") }) },
        content = {
            Box(modifier = Modifier.fillMaxSize(), contentAlignment = Alignment.Center ){
                Button(onClick = { navController.navigate("child1") }) {
                    Text(text = "Go to Child of Screen 1")
                }
            }
        })
}

@Composable
fun Child1(navController: NavController) {
    Scaffold(
        topBar = {
            TopAppBar(
                title = { Text("Screen 1") },
                navigationIcon = {
                    IconButton(onClick = {
                        navController.popBackStack()
                    }) {
                        Icon(Icons.Filled.ArrowBack, null)
                    }
                })
        },
        content = {
            Box(modifier = Modifier.fillMaxSize(), contentAlignment = Alignment.Center ){
                Text("This is the Child of Screen 1")
            }
        })
}
Clicking on the Button on Screen 1 will push the child screen onto Screen 1
Flat
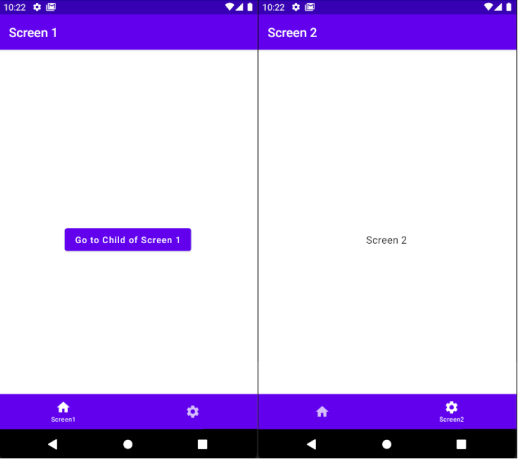
Now let’s look at Flat navigation. All the primary screens can be navigated from the main screen. We’ll build and use a BottomNavigation Bar to implement flat navigation.
First Let’s add another screen (screen2) to the Router
@Composable
fun Router(navController: NavHostController) {
    NavHost(
        navController = navController,
        startDestination = "screen1"
    ) {
        composable("screen1") {
            Screen1(navController)
        }
        composable("screen2") {
            Screen2()
        }
        composable("child1") {
            Child1(navController)
        }
    }
}

@Composable
fun Screen2() {
    Scaffold(
        topBar = { TopAppBar(title = { Text("Screen 2") }) },
        content = {
            Box(modifier = Modifier.fillMaxSize(), contentAlignment = Alignment.Center) {
                Text(text = "Screen 2")
            }
        })
}
Now let’s create a BottomNavigationBar, a component that takes in a list of nav items, a nav controller, and an item click handler. It then loops through nav items to display them in within a BottomNavigation. Note the BottomNavigation returns a RowScope so all items rendered in this component will automatically be rendered in a row.
data class BottomNavItem(
    val name: String,
    val route: String,
    val icon: ImageVector
)


@Composable
fun BottomNavigationBar(
    items: List<BottomNavItem>,
    navController: NavHostController,
    modifier: Modifier = Modifier,
    onItemClick: (BottomNavItem) -> Unit
) {
    val backStackEntry = navController.currentBackStackEntryAsState();
    BottomNavigation(modifier = modifier) {
        items.forEach { item ->
            var selected = item.route == backStackEntry.value?.destination?.route
            BottomNavigationItem(
                selected = selected,
                onClick = { onItemClick(item) },
                selectedContentColor = Color(0xFFFFFFFF),
                unselectedContentColor = Color(0x88FFFFFF),
                icon = {
                    Column(horizontalAlignment = Alignment.CenterHorizontally) {
                        Icon(
                            imageVector = item.icon,
                            contentDescription = item.name
                        )
                        Text(text = item.name, textAlign = TextAlign.Center, fontSize = 10.sp)

                    }
                }
            )
        }
    }
}
The last step is to change the MainActivity to return a Scaffold with a bottomBar.
class MainActivity : ComponentActivity() {
    override fun onCreate(savedInstanceState: Bundle?) {
        super.onCreate(savedInstanceState)
        setContent {
            MaterialTheme {
                val navController = rememberNavController()
                Scaffold(
                    bottomBar = {
                        BottomNavigationBar(
                            items = listOf(
                                BottomNavItem(
                                    name = "Screen1",
                                    route = "screen1",
                                    icon = Icons.Filled.Home
                                ),
                                BottomNavItem(
                                    name = "Screen2",
                                    route = "screen2",
                                    icon = Icons.Filled.Settings
                                )
                            ),
                            navController = navController,
                            onItemClick = {
                                navController.navigate(it.route)
                            }
                        )
                    }
                ) {
                    Router(navController = navController)
                }
            }
        }
    }
}
Final result: