Kotlin Dependency Injection with Hilt

It is encouraged that you divide your code into classes to benefit from separation of concerns, a principle where each class of the hierarchy has a single defined responsibility. This leads to more, smaller classes that need to be connected together to fulfil each other’s dependencies.
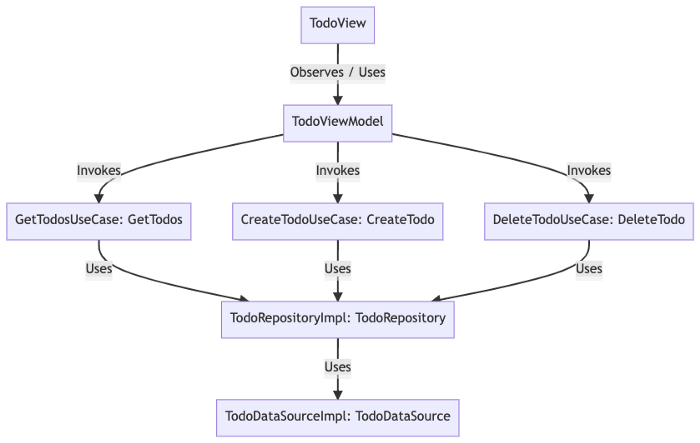
Of course, we can use good old manual dependency injection as follows:
class MainActivity : ComponentActivity() {

    override fun onCreate(savedInstanceState: Bundle?) {

        val viewModel = TodoViewModel(
            GetTodos = GetTodosUseCase(
                todoRepository = TodoRepositoryImpl(
                    datasource = TodoDataSourceImpl()
                )
            ),
            CreateTodo = CreateTodoUseCase(
                todoRepository = TodoRepositoryImpl(
                    datasource = TodoDataSourceImpl()
                )
            ),
            DeleteTodo =  DeleteTodoUseCase(
                todoRepository = TodoRepositoryImpl(
                    datasource = TodoDataSourceImpl()
                )
            )
        )

        super.onCreate(savedInstanceState)
        setContent {
            TodoView(viewModel)
        }
    }
}
class TodoViewModel  constructor(
    private val GetTodos: GetTodos,
    private val CreateTodo: CreateTodo,
    private val DeleteTodo: DeleteTodo
) : ViewModel() {

...

}
class GetTodosUseCase(private val todoRepository: TodoRepository) : GetTodos {
    ...
}
class TodoRepositoryImpl(private val datasource: TodoDataSource) : TodoRepository {
    ...
}
class TodoDataSourceImpl() : TodoDataSource {
    ...
}
To ease the pain of dependency injection, we are going to use Hilt to manage and resolve our dependencies.
To use Hilt, add the following build dependencies to the Android Gradle module’s build.gradle file:
plugins {
    ...
    id 'dagger.hilt.android.plugin'
}
dependencies {
    ...
    implementation 'com.google.dagger:hilt-android:2.39.1'
    implementation 'androidx.hilt:hilt-navigation-compose:1.0.0-alpha03'
    kapt "com.google.dagger:hilt-compiler:2.39.1"
    kapt "androidx.hilt:hilt-compiler:1.0.0"
}
Note: you only need “hilt-navigation-compose” if you intend to inject view models
Let’s start.
- Make your project aware of Hilt and that's it’s going to do DI for you
- Mark the android activity that is going to be the root or starting point of all DI
- Tell Hilt how to provide instances of a ViewModel.
- Mark class constructors with @Inject to tell Hilt how to create instances of a class.
- Create your IOC container
Create Hilt Android App
All apps that use Hilt must contain an application class that is annotated with @HiltAndroidApp.
Create a file in the root package:
import android.app.Application
import dagger.hilt.android.HiltAndroidApp

@HiltAndroidApp
class TodoApp : Application()
Update your application name in your AndroidManifest.xml file
<?xml version="1.0" encoding="utf-8"?>
<manifest xmlns:android="http://schemas.android.com/apk/res/android"
    package="com.diexample">

    <application
        android:name=".TodoApp"
        ...
    >
        ...
    </application>

</manifest>
Mark MainActivity as AndroidEntryPoint
For Hilt to be able to inject dependencies into an activity, the activity needs to be annotated with @AndroidEntryPoint. Let’s change our MainActivity from before to:
@AndroidEntryPoint
class MainActivity : ComponentActivity() {
    override fun onCreate(savedInstanceState: Bundle?) {
        super.onCreate(savedInstanceState)
        setContent {
            TodoView()
        }
    }
}
@Composable
fun TodoView(vm: TodoViewModel = hiltViewModel()) {
   ...
}
Create IOC Container
Next, we create our container to list and resolve our dependencies.
@Module
@InstallIn(SingletonComponent::class)
object AppModule {

    @Provides
    @Singleton
    fun providesTodoDatasource(db: TodoDatabase): TodoDataSource {
        return TodoRoomDataSourceImpl()
    }

    @Provides
    @Singleton
    fun providesTodoRepository(dataSource: TodoDataSource): TodoRepository {
        return TodoRepositoryImpl(datasource = dataSource)
    }

    @Provides
    @Singleton
    fun providesGetTodosUseCase(repository: TodoRepository): GetTodos {
        return GetTodosUseCase(todoRepository = repository)
    }


    @Provides
    @Singleton
    fun providesCreateTodoUseCase(repository: TodoRepository): CreateTodo {
        return CreateTodoUseCase(todoRepository = repository)
    }

    @Provides
    @Singleton
    fun providesDeleteTodoUseCase(repository: TodoRepository): DeleteTodo {
        return DeleteTodoUseCase(todoRepository = repository)
    }


}


